Pages

Saturday, November 30, 2013

Ribbon Sculpture Hair Accessories: Ariel, the Little Mermaid

I guess the thing to do when you have a little girl, is to put lots of bows and ribbons in her hair?  I'm not a girl-y girl, and honestly, my munchkin has never really let me put that kind of stuff in her hair, until recently.  

do you like my model?!
For a friends bday party, I decided to try my hand at Ribbon Sculpture.  Every holiday, animal, cartoon character - it seems someone out there has made it out of ribbons.  Just look on Pinterest!


A few months back, I found a tutorial for many of the Disney Princesses.  So in addition to an Arial coloring book and some Princess temp tattoos, I made a hair clip and a headband.


I had all the ribbon on hand, and all I had to purchase was some headbands and alligator clips.


Once I figured out what I was doing, the whole process was pretty easy.  I think I got country Ariel done in 30 minutes or so :)

I'm definitely going to try making the other princesses and some Christmas ones, too!  Update:  Check out the other princess here!

Happy Crafting!


Saturday, November 9, 2013

Handmade Halloween: M&M costumes for the whole family!

That's right.  For Halloween this year, I dressed up our family of three as M&Ms.  The little one, who's initials are MM, was a green M&M.  


Momma was a bag of plain M&M's.


And the Dadda was a bag of peanut M&Ms.


Now, if we had a second child, especially if it was a boy, he would have been a red M&M.  Not sure if I would have made him a peanut M&M, since oval is a little harder to accomplish than a circle.

Costumes were simple to make.  The bags are basically pillowcases with arm holes and pocket holes (yes, these are very important to get to your camera and wallet!)  The candy costume is a simple circle with stabilizer sandwiched between two layers.  If i were to do it again, i would make the parts around her side elastic for easier off and on.


The above is the font I used for the lettering.  For the bags, I blew the M up to the max I could fit on a 8.5x11 sheet of paper.  The & s I blew up the same %.  The M on the candy was smaller, I just eye-balled it based on the circle.

Word to the wise:  use iron on transfer for the letters.  Both the letters and the white that goes on behind it...it will make your life SO much easier.  I ironed on random pieces to hold them in place while sewing them on, and it's not worth it.  The iron on stuff will hold long enough for you to get several uses out of the costumes :)  and save you the hassle of sewing!

I'd say it took me a total of 4 hours to sew the three costumes, and another hour or so to get all the letters cut out.  I bought waay too much fabric for these (i'm an over-estimator, for sure!) and spent less than $20 for the three.

Hopefully, I can convince my family to put their costumes back on for a photo op of all three of us together :)


Happy Creating!

See the whole family here.


Tuesday, August 27, 2013

My Little Pony Playmat and Take-a-long Barn

I made a playmat for a 3 year old's birthday.  It can be used with My Little Pony or those toob animals or whatever kind of animals you want!


Here is a green pasture surrounded by a fence.  The fence is made from felt and pipe cleaners (or as some call them, chenille stems).  They took FOREVER to sew and to get to stand upright.  


The fence gates swing open.  And they move around, so the play mat still rolls up and fits in the take-a-long barn.  Like the spoon?  haha. 


I left a spot at the back of the fence for the barn to fit.  The barn opens up in the green pasture for the ponies to play in the paddock.


They can leave the paddock through the gates and walk along the stone path to cross the bridge over the "raging" river.  The river is 3 layers of wired ribbon sewn with a meandering stitch down the middle.


On the river banks, the ponies can explore and find some hidden gems.  (yes, i know star fish aren't in rivers, but....)


They can also hang out in the field with the wild flowers.


The barn closes up and Velcros closed, in case there is a storm, or it gets cold at night.


Side door for the farm to get in a muck out the stalls if needed...


A lovely little sunflower


Yes, the ponies prefer to be outside in the sunshine, so sometimes the cobwebs build up and spring cleaning is required.  But don't fear, there is a shovel and a rake to help reach the high cobwebs...


This project kept growing and growing.  It started out pretty simple, but I couldn't leave well enough alone.  

Check out these two tutorials for "building" details:

Smashed Peas and Carrots: Fold n Go Pony Farm
UK Lass in the US:  Fabric Dollhouse Tutorial


Monday, August 26, 2013

Sesame Street Crayons

Have you ever thought of making crayons?  And by making, I mean melting down crayons and pouring the wax into molds.  


Do a quick search on etsy for sesame street crayons - $4.50 (plus shipping) for six crayons.  Are you kidding?  A 24 pack of crayola was just selling in back to school sales for 25 - 50 cents.  


I picked up a Sesame Street mold off ebay, for maybe $6, including shipping.  One character uses about 2 crayons (cookie monster and oscar were closer to 4).  So for less than $10 ($6 for the mold and $2.50 for 5 packs of crayons), I made  about 40 characters.  


I did grover in red because he kind of looks like elmo.  And there's a lot of red in a box of crayons.  And purple and orange too.  I had soo many ernies!  He's the only orange one.  Yellow had big bird and bert.  Blue was Cookie Monster and Grover.  I think I only got 4 Oscar the Grouchs...not much green in a box.

Anyway, I packaged them a so that there was only one color in each pack, but 5 characters...although some had two Berts or Grovers b/c they were different colors.

My two year old snapped most of their heads off pretty quick, but whatever. I had fun making them!


P.S.  There are lots of tutorials on making crayons.  Here's what you need to remember:  1. don't get the wax wet.  2. Crayola Crayons begin to soften at around 105 degrees Fahrenheit and they have a melting point between 120-147 degrees Fahrenheit. The melting point is the same for all regular Crayola Crayons, however, because of the density and amount of pigment included in various crayons, the thickness or viscosity of the melted mixture will vary.  Put your crayons in a baby food jar on a candle warmer (mine was the perfect temp) or on a tray in your oven or toaster oven on it's LOWEST setting...mine was warm which is around 150 degrees F. I found that if I took my jars out of the oven and let them cool about 4 - 5 minutes - until I could pick them up with my bare hands - the wax would pour perfectly; if the wax was too warm, it would run down the side of the jar and make a mess. 3. This is messy.  If you are going to freak out about getting wax on your pot holder, you might want to skip this project. 4.  Crayons cool faster in the fridge 5.  Layers don't always work out so well, depending on how cool you let them get.   Some of mine separated, others would out perfectly - see what works for you with one or two before doing an entire tray!

Sunday, August 18, 2013

Art Journalling: Mermaids and Under the Sea

Another day, another swap :)  Not much to say about this one.  I had to start a new journal (which was my first venture into coptic stitch binding - Sea Lemon has a great tutorial on youtube).  It came out ok, not the greatest work ever, but it'll hold up :)


I really like this spread.  I'm still "stealing" other peoples art, but at least I'm mixing it up a bit, changing a bit here and adding something different over there.  Ha.  Maybe soon I'll be inspired to draw something all my own!  

I don't know why the left side scanned blurry...I don't like the green seaweed and the wave above it was my attempt at coloring the background.  ek.  so that's when the whole background got colored in three shades of blue and blended...my blending pencil doesn't work so great with my colored pencils (crayolas from my teen years) but until I invest in something fancier, I'll use what I have :)  

Even with all the i-don't-like-this parts of spread, overall I do like it, and that's what really matters, right?


Saturday, August 17, 2013

Another Swap: Doodle Dandy

I joined yet another swap for drawing.  This time around, I had to answer 16 questions in doodles :) 

The Questions:
1. What is your favorite type of weather?
2. What kind of pets do you have?
3. What is your favorite food?
4. What does your perfect day consist of?
5. What is something you collect?
6. Which season is your favorite?
7. What is the weather like today?
8. What is your favorite color?


9. Where do you want to travel?
10. What's your favorite beverage?
11. What means the most to you?
12. What's one of your hobbies?
13. What is your favorite thing about summer?
14. What is something you couldn't live without?
15. What do you look like?
16. What is your favorite animal?


So there you go!  I think my answers are pretty self explanatory!  


Friday, August 2, 2013

Another Swap Art Journal: Magazine and List, List, List!!

I joined another swap.  This time for a Mini Handmade Art Journal.  I missed the first in the series, so this time around, I had to make a mini journal.  I forgot to take a picture of the journal :(  The first round was to find a beautiful picture in a magazine, cut it out, and make 
that the center of your art journal page.  I decided to put my own art in my journal to make up for the missed round. 

Here's what I came up with:


The part of the left, I totally stole from someone.  I mean, I drew this myself, but totally not my idea!

For round #2, the prompt was: List, List, List! Your journal spread must include a list somewhere. Again, I stole this idea from someone, but at least I filled it in with my own tasks and sketches :)  


This journal belongs to emilymay42 of swap-bot.  She hasn't logged in for a few months (and never actually participated in this swap series, but started a different one, so....) but whatever, I just wanted to draw something!  I'll keep passing this one on!

Well, until the next round starts...Happy Swapping!


Tuesday, July 30, 2013

Teddy Bear Pancakes for a Teddy Bear Picnic

July 10th is National Teddy Bear Picnic Day.  Now, don't confuse this day with Teddy Bear Day - that's September 9th.  

Teddy Bears, in case you didn't know, were named after our 26th president,  Theodore Roosevelt (nicknamed Teddy, but according to wikipedia he loathed being referred to by such.)

Anyway, my mom's group decided we were going to have a Teddy Bear Picnic for the kiddos.  Some other moms were making bear themed foods for the picnic, so I decided to do the same.  I didn't want to go with a sugary item, so I decided to make pancakes shaped like bear heads!


First, you'll want to make two batches of pancake batter.

1/2 recipe of Bisquick supreme (see the back of the box)
and 1/2 recipe hot chocolate  (see recipe here) this is a glorified Bisquick recipe.

If you are anti-Bisquick, you could probably alter your favorite pancake recipe with some chocolate milk and cocoa powder accordingly.  Personally, Bisquick pancakes are my favorite, so I use what I know!
you could do full recipes, but you'll be making bear heads forEVER!

You'll want to put each batch in a squeeze container.  I used one for making chocolate, but a condiment one would do fine.  And I could only find one of my chocolate squeeze containers, and it worked out ok, you can see some of my bear heads are not really round as a result.


1.  Squeeze out white batter for muzzle area (I did all 4 at once).
2. Flip white muzzle (do these one at a time)
3.  blob chocolate over muzzle trying to keep round shape while getting full coverage (I used a spoon for this part, but the squeeze bottle would have been better here!)  If you wait too long, the muzzle starts to get overcooked (browned) and blends in with the chocolate head)
4. add ears with white.
5. Let cook a minute or so and flip.  Finish cooking.

I did the whole batch (including trial and error) in about 25 minutes.  Didn't take too much longer than making regular pancakes once I figured out the order!

You could also change it up and do chocolate muzzle/ears and a white face.  I was working with only one squeeze bottle...

Now you'll need to add a face.  I used white chocolate chips and mini chocolate chips.  You could also use the sugar eyes found in most baking sections (I've seen them at Hobby Lobby and Wal-mart for ~$4 for 12 pairs)

Insert white chips pointy side into the pancake.  If your cakes are still hot, your chop may melt enough for the next step.  If not, microwave your cakes with chips inserted for 10 seconds - this will soften them up enough to get the mini chip in.  Now stick your mini chocolate chip up-side down on the white chip.  This part could be difficult if you have unsteady hands.  I work with beads and threading needles, so I had no problems.  

Eyes, done.


I drew little bear faces with melted chocolate and a paint brush.  I'm not a fan of that method.  Use frosting and a decorator bag with tip, or find another way.  The chocolate painting was TEDIOUS.  The most tedious of the whole thing.


 Not the best pictures in the world, but there's no natural light at 11 o'clock at night!

As you can see, this made 13 bear heads.  I probably ate 4 mistakes.  And made a bunch of plain ones.  I would say one full recipe makes 20 heads?

Let me know if you try these!  The kiddos loved them.  No need for syrup or even heating them up.  We ate them just the way they were!!


Sunday, July 28, 2013

Fairy Tale Friend

I joined another swap... make a "friend" and keep a journal of your summer adventures together! Then pack up your friend and story and send it to your partner.

Meet Pearlina Wishwater:  


Standing at 3 3/4 inches and weighing 1.5 ounces, Pearlina hails from the Red Coral Clan.

Her tail is known to glisten with phosphorescence under the night sky, but being a little older in years she doesn't stay out late like she used to!  

Still young at heart, her pastimes include wave surfing close to the shore on windy days, collecting treasures from the beach and ocean to create interesting caches!

Here is a little video of her journal now on its way to my swapping partner :)


I made the journal with my bind-it-all by wrapping some material around thin cardboard (old cereal boxes) and the pages are card stock.  Some of the pages are lined with water color paper or additional card stock.

Disclaimer:  I drew and created most art in the journal.  However, some of the art I mimicked from other artists.  Some of the art (like the magazine covers) are other artist's work completely.  I make no claim to any of that art :)

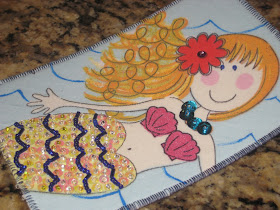
Fabric Postcards

I joined a swap to make Fabric Postcards.   You had to add color in some way other than fabric or thread.


I decided I wanted to use this mermaid fabric b/c well, I love mermaids!  I added sequins and beads to her tail.  She got a sequin up-grade on her necklace too!  I used paint to accentuate the background waves.


A couple weeks later, we went to a swim play date at a friends house.  Both the hostess and her daughter love mermaids so I did another version of the above postcard, this time including a little fish.


I tried a fancy stitch from my sewing machine...I think it's pretty :)


Friday, July 26, 2013

Dolphin Frame

For the family vacation this year, my husband's family traveled the nearly 1,000 from Ohio to stay at a beach house in Pensacola, FL.  At the end of our trip, we were perusing the tourist merchandise, and found this:


My MIL liked it, but even at $15, it felt SUPER flimsy.  And we joked about how I could make something better.  

I don't know if what I made is better or not, but it is more personalized...


On a couple different days during vacation, we saw dolphins swimming right off our docks!  The boys jumped in and tried to wade after them...


The next day, we had a rented catamaran and pushing off the beach we spotted the pod again and got chased by a couple of the dolphins - it was only for 10 feet or so, but it was still pretty cool. 


I found the frame at TJ Maxx for less than $5.  Sanded it down, painted it grey and added some sort of poem or saying about moms and family.  Attached the wire dolphin that I hand wove with glass beads, added the picture and here we go.  Mother's Day present.  This is the frame displayed in our house and it *almost* motivates me to make another to keep for myself :)