Sunday, November 27, 2011
$2 free Amazon mp3 credit
Here’s a coupon code for a free $2 mp3 credit at Amazon! Just enter code STUDYBRK here and pick up some free music! I'll be using mine towards Sigh No More by Mumford & Sons.
Wednesday, November 23, 2011
Herbed-Swirl Rolls
This is the third Thanksgiving I've made these rolls. And every year I forget how good they are! I have no idea why i don't make them more often!!
Herbed-Swirl Rolls:
1 (1 pound) loaf frozen bread dough, thawed
3 TBS butter, melted
2 TBS minced chives (I've also used green onions)
2 TBS dried parsley flakes
1/2 tsp dried thyme
1/4 tsp salt
1/4 tsp pepper
1 egg
2 TBS water
Sesame and/or poppy seeds
- On floured surface, roll dough into ~14" x 12" rectangle. Brush with butter. Sprinkle with chive, parsley, thyme, salt and pepper.
- Roll up jelly roll style, starting with the long side. Pinch seam to seal. Cut into 12 in slices (I like to cut in half, then cut each half in half. You now have 4 sections...then just cut each section into thirds...ta-da!)
- Place cut side down (or up) in greased muffin cups. Cover and let rise until doubled, about 45 minutes. (Mine don't usually looked doubled...sometimes I just wait until they get puffy and are squishy to touch)
- Whisk egg and water together and brush over tops. Sprinkle with seeds.
- Bake at 375 degrees for 12 - 15 minutes or until golden brown. Remove from pan to wire rack (or cutting board) to cool.

 |
| I made 3 dozen this year, but only 30 will be making it to Thanksgiving dinner...my husband and I may have eaten a few "for lunch!" |
Herbed-Swirl Rolls:
1 (1 pound) loaf frozen bread dough, thawed
3 TBS butter, melted
2 TBS minced chives (I've also used green onions)
2 TBS dried parsley flakes
1/2 tsp dried thyme
1/4 tsp salt
1/4 tsp pepper
1 egg
2 TBS water
Sesame and/or poppy seeds
- On floured surface, roll dough into ~14" x 12" rectangle. Brush with butter. Sprinkle with chive, parsley, thyme, salt and pepper.
- Roll up jelly roll style, starting with the long side. Pinch seam to seal. Cut into 12 in slices (I like to cut in half, then cut each half in half. You now have 4 sections...then just cut each section into thirds...ta-da!)
- Place cut side down (or up) in greased muffin cups. Cover and let rise until doubled, about 45 minutes. (Mine don't usually looked doubled...sometimes I just wait until they get puffy and are squishy to touch)
- Whisk egg and water together and brush over tops. Sprinkle with seeds.
- Bake at 375 degrees for 12 - 15 minutes or until golden brown. Remove from pan to wire rack (or cutting board) to cool.

Tuesday, November 22, 2011
Oreo Turkeys

With Thanksgiving only a couple days away, I thought I would try making Oreo Turkeys. These would make awesome Thanksgiving place holders - if your family is into that sort of thing...mine? We are lucky if we can find a seat at a table. Last year, I ate while standing in the kitchen - all the chairs AND couches were taken and I wanted to eat while it was still hot :)
 Supplies:
Double Stuff Oreo Cookies
Whoppers
Candy Corn
Peanut Butter Cups - Miniatures
Chocolate Frosting*
Yellow Frosting*
Red Frosting*
Black Sprinkles/Nonpariels
*I used the pre-filled tubes of frosting for the yellow and red, since I had it on hand. However, if you buy these at the store, i recommend also getting the specialized "tips" for the tubes - I didn't have any and had to improvise :)
To Start:
Slather a dallop of frosting in the crack of an oreo about an inch long and stuff 5 candy corns into the frosting being careful not to shove them in too far or the oreo cookies could crack...that would be bad and you'd be forced to eat the cookie!
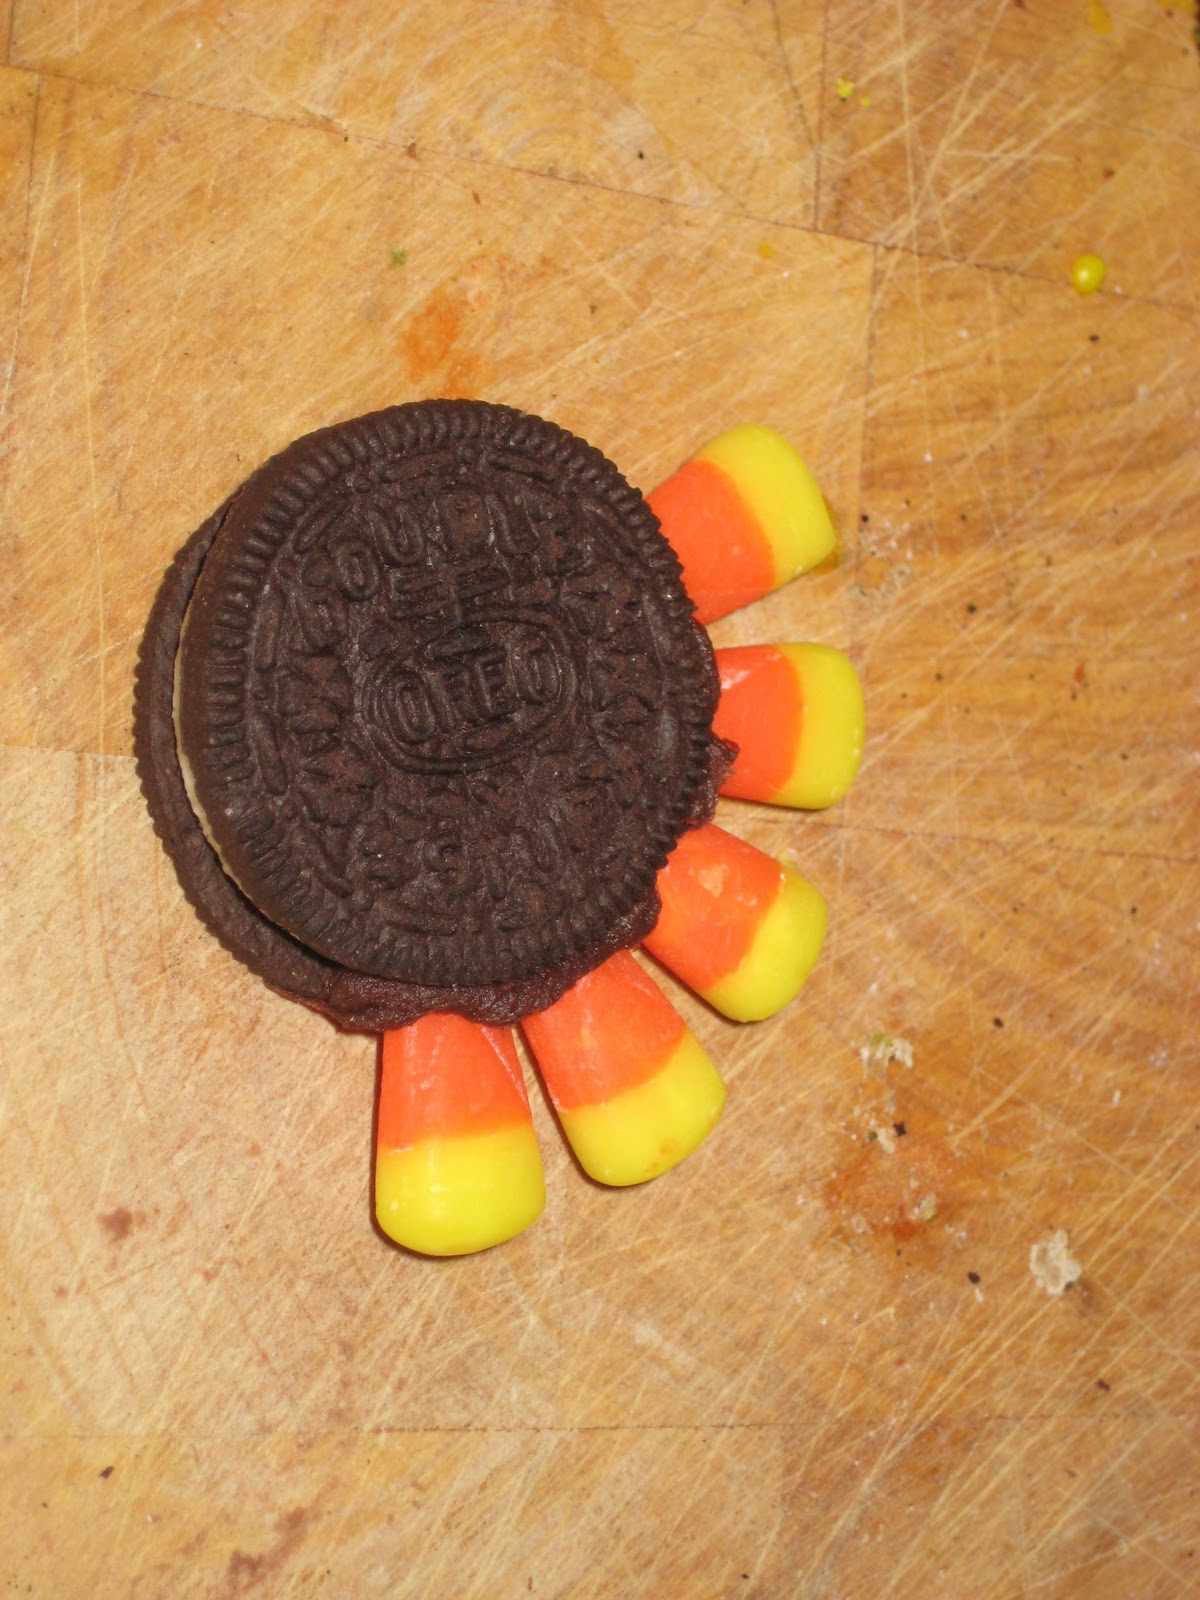
Next put another dallop of frosting on the opposite end of the cookie and secure it to the base...it helps to lean them up against the wall (or a ziploc bag box) to hold them in place while they dry.


Add another dallop of frosting to the cut edge of the Peanut Butter cup..attach this to the bottom oreo cookie.


Next, we need to give the turkey a head! Smear another dallop of frosting to a whopper and attach frosting side to crevice between PB cup and cookie.

Cut off white part of candy corn and add a tiny bit of frosting. i used the yellow, but chocolate would work here, too...

Attach to whopper...

Add two dots of yellow frosting and a non-pariel or sliver of a chocolate sprinkle (or as i grew up calling them: sprinkles)

Now your Oreo Turkey should be ready to flip over!


But that's ok, because the kids don't care :) Stick them on a plate (with the messed up face in the back) and everyone will say "Awwww..." You can always blame the messed up face on the car ride to dinner :)
Have fun!!
Monday, November 7, 2011
Resin...

While I was out walking my little M&M the other day, I found these little berries and flowers growing on the sidewalk; I don't know what they are, but I'm guessing they are a weed! But they were cute and I think they are going to look FABulous encased in resin. I also found bigger orange berries, red berries, and tinee tiny pine cones - all which I also want to get into resin. However, I don't have enough molds!! I ordered more last week from beadaholique, but I haven't received them. {drumming fingers on desk} I am being patient! Anywho, I got the first layer down with the berries and flowers...more pics coming later in the week :)
 |
| bangle... |
 |
| pendants...totally loving the bottom one! |
Sunday, November 6, 2011
Got my "craft" on today...


Subscribe to:
Posts (Atom)