Pages

Friday, December 21, 2012

DIY Christmas: Hooded Owl Towel

Hooded towels are a pretty easy project that you can whip out in an hour or so...and they make great gifts for the kids in your life.  


The instructions for this cute little owl towel came from CrazyLittleProjects, be sure to check out her array of hooded towels from owls to angry birds to frogs to ladybugs...they are all cute!  And I just noticed she has a new one posted for a reindeer - just in time for a last minute Christmas project!


Anyway, my niece LOVES taking baths, so she's getting this cute owl towel as part of her Christmas present.  


I have a couple more towels I made that I'll show you next week, I just haven't taken photos yet!


Tuesday, December 18, 2012

DIY Christmas: Felt Food - T-bone Steak, Corn on the Cob and Ribs


I didn't make any tutorials or anything for my felt food, because there are A TON of tutorials out there and if there isn't, well, it's pretty easy to figure it out for most stuff!  I'll include whatever links I used to help you out :)


I used wool felt as it is far superior to the acrylic stuff you can find in most craft stores.  I won't get into why it's better other than it's sturdier and will last a lot longer.  So for the effort I'm putting in to make this stuff, I want it to last.  

I got mine from Christmas Keepsakes on Etsy.  She has a great assortment of colors, reasonable shipping and the felt is wonderfully soft and so easy to work with!


The ribs were the most fun to make!  I included a magnet on each side (one on the top of the left piece and one on the bottom of the right piece) and a soda or beer top on the opposite side for the magnet to stick to.  I wish I had used a darker red color for the barbecue sauce, because this red is the same as ketchup :(


I LOVE the little grill lines on the t-bone steak.  I set my sewing machine to a wide zig zag and a relatively short stitch length.  I only made grill marks and the t-bone on one side.  


The corn on the cob was a little time consuming for me to figure out.  I wanted them to look like corn sections, so there's white cob on both sides.  Since the "kernels" were woven (although there are other styles out there in blogland) and I didn't want stuffing showing through, I sewed some quick stitches to hold it all together.  A couple cobs were hand sewn, and then I got lazy and machine stitched.  I don't have a preference to which looks better, but the machine sewing was definitely faster!

1. Ever Never Again  2. Squirrel Bait Crafts  3. Cook Clean Craft  4.  Bug Bites Play Food
 For more felt food ideas, visit my pinterest board:  Felt Food & Play Kitchens.  There's more felt food coming up later in the week...Stay tuned!  To see the post about the play grill, go here.


Monday, December 17, 2012

DIY Christmas: Felt Food - Toy Grill

I decided to make felt food for my bestie's little girl's christmas present this year.  As I was searching pinterest for a themed idea, i came across Apartment Therapy's Toy Grill out of a plastic bowl and wooden dowls.  Awesome!  A little more searching, and I found that Ever Never Again had used that same tutorial with a couple adjustments to make it look like a weber grill (or in my case, a BIG GREEN EGG!)


As Ever Never Again suggested, I went ahead and made two at the same time.  It was well worth it.  As it was a time consuming project (even with my husband's help), I wouldn't want to go back and do it again later!


The other thing I did a little differently was to make the grate sit flush in the grill.  Neither my husband nor myself like the way the lid sat on top of the grate, so he trimmed one side down, sanded and touched up the paint.  Now the lid rests on the bottom bowl and the grill is fully closed.  It would be interesting to try and put a hinge on the lid and grill so that it would stay open like the big green egg, but we decided we had already invested enough time and money so went without!


 I used regular syrofoam to make the charcoal briquettes, but was not able to use spray paint on them, and ended up using a foam brush and acrylic paint...sooo much effort!  Never Ever says she used spray paint...maybe her foam was different than mine, but mine started dissolving in the spray!


I like how they turned out!  I hot glued them in the bottom of the grill and glued the grill rack on too.  The styrofoam is flakey, and my daughter was covered in bits of black foam when she would try to play with the charcoal. 


The ash tray on the bottom was REALLY hard to find.  I ended up using a large tuna can, but it only fit on the green grill and not the purple one.  I need to spray paint a peanut butter lid for the purple one.  I recommend finding a good size can or lid FIRST, then fitting your triangle pieces on where the lid fits best!


The two of these grills cost about $35 to make both.  I know I got the dowels for $12, the bowls were $2 each at Wal-mart (mine are 11" diameter), one block of styrofoam was $3.  Walmart sells spray paint really cheap - they had black, white and grey a for $1 a can!  I really wanted silver so got a can for $4 (i needed about 1 1/2), still $4 cheaper than home depot or lowes!  The handles came from Lowe's or HD and were about $2 each.  We had hot glue and screws on hand.


If you are making the lid with the handle, don't forget to buy some shorter screws than what comes in the package!  We didn't, and to save us a trip BACK to the store, my husband cut the screws to fit.  Would have been a lot easier to just have the right sized screws to start with!


I made some fun BBQ felt food to go with the grills and later in the week I will share more pictures with links to tutorials!  Stay tuned!


Sunday, December 16, 2012

DIY Christmas: Doily Canvas Bag

Now, I did make this bag waay back for Mother's Day, but this could easily be a great bag for teacher or neighbor's gifts, or even used to "wrap" your christmas presents!


Ashely Ann Photography has a great tutorial posted on her website!  I'll give you the quickie:  use spray adhesive to adhere a doily to a canvas bag.  Use a sponge brush to fill in all the nooks and crannies with fabric paint (acrylic paints work too, but realize they will fade more with each wash).  Peel away doily while paint is still moist.  Draw and color in your letter (i used freezer paper and my silhouette machine to cut a J).  Use an iron to heat set.  Finished!


We filled the bag with wine, cheese, crackers, pasta, sauce, and some artisan bread.  Perfect for a busy work night dinner!


The second bag I made (which I forgot to take pictures of before mailing out!), I put the doily off center in the bottom right of the bag.  A slightly different look that I liked, too!


Friday, December 14, 2012

DIY Christmas: Shell Earrings

Let me start off by saying, HAPPY BIRTHDAY, MOM!!  luv you!

Wow.  These were hard for me.  Don't get me wrong - the making part was easy...it was the designing process that was hard.

I'm not super creative.  I'm pretty good at copying other people's ideas, and I'll even put my own twist on them sometimes.  But coming up with my own ideas?  That's hard. 

My task?  Use shells my mom collected on her yearly trip to Aruba to make a pair of earrings.  You'd think this would be pretty easy.  I mean, have you even looked for shell earrings on etsy?  They are all over the place. 

First, I had to come up with a way to attach a jump ring to the shell.  I drilled holes in couple shells, and it worked fine for the bigger ones.  But the smaller ones were just too thin and fell apart.  


So out came the hot glue gun.  I was a bit worried the hot glue would discolor the shell, but so far so good.  And everything seems to be holding pretty well.


These earrings took about 2.5 hours to "design" and about 30 minutes to make.  Then 20 minutes to put everything away.  Ugh.  My least favorite part.  But they are done and I'm pretty happy with them.


I'm not usually a fan of mixing metals.  I'm strictly a silver girl, and occasionally will do antique copper.  But this time around, the shiny copper on shiny silver won out and I think I'm in love!  I hope my mom is too!


p.s.  these might be the worst pics I've ever taken of my earrings.  I trashed my light box when we moved, and I've yet to make a new one!  These pictures are using my camera flash. Gasp!

Sunday, December 9, 2012

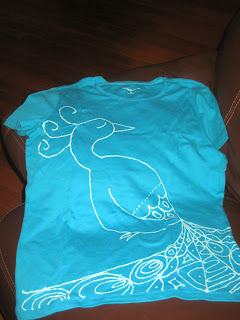
DIY Christmas: Bleach Pen Shirts

Well, I've wanted to try my hand at those bleach pen shirts I've seen all over Pinterest...Here are the results:


This one was SUPER easy.  I found a Hunger Games silhouette on Google Images and cut it out of card stock using my Silhouette :) and used spray adhesive to temporarily attach it to the tee.  Have I ever mentioned my LOVE of spray adhesive?


I put ~ 2:1 bleach:water solution in a small spray bottle (i used an emptied mini spray from bath and body works) and lightly sprayed the tee.  FYI:  bleach will peel paint off of your garage floor - either cover up the floor or do it outside!!  The color changed immediately.  Once the color faded the way I liked, I peeled the card stock off (you'll be getting bleach on your hands unless you wear gloves!) and rinsed the shirt under the kitchen sink.  I recommend rinsing 4 or 5 times.


 For this one, I bought myself a Clorox Bleach Pen for Whites with two tips.  I used the fine tip to draw on the tee.  I'm glad a did a practice squeeze beforehand b/c the first bit came out as a glob!  Other than that, the pen flow was good and steady with few air bubbles.  It was easy to hold. 


I let the gel dry completely, about 10 minutes, so that the bleached spots would turn completely white - unlike the above shirt that just went pink.  Then I rinsed it off in the sink.  Again, 4 - 5 times to make sure that no bleach gel was left on the shoulder or anything.  Then I tossed them both in the wash with a full load.  

I got both shirts from Kohl's for $5, but you could easily do this will old stained tee's.  Have fun!!


Friday, December 7, 2012

First Present of the Year: Wrapped


I wrapped my first Christmas present of the 2012 Holiday season.  It took me all day to get it done. Between watching the child all day and watching tv all evening, I really felt like I wasn't getting anything accomplished.

Jeffery Brown, of the book, Darth Vader and Son, released download-and-print gift tags to promote the sequel, Vader's Little Princess, slated for release May 2013.  I changed it up a bit to be a hang tag for inside the Darth Vader shoes I made for a Christmas gift.


I used my Sihouette to cut out the 'USE THE FORCE' lettering and the Darth Vader silhouette, which I got here and here.  Just in case the recipient needs a hint as to what's inside!

Now to get a move on the rest of the presents.  Especially because so many are getting shipped out this year, and I REALLY want them to arrive BEFORE the holiday this year!


Thursday, December 6, 2012

DIY Christmas: Handprint Ornaments

another craft item from pinterest...I made 3 of these last year, but only completely finished one.  got the front done on the second one, and did absolutely nothing with the third. This one went to Granny!


I made my own porcelain.  I believe it was a cooked cornstarch recipe...I tried some other recipes but they didn't hold a handprint well and had way too many cracks to be useful.  See below for recipe I used.

I used a ultra thin black sharpie to outline the snowmen, then totally copied mommymucho and decorated the snowmen with acrylics.  I'm crafty, but not creative! 


I found this poem on the internet (sorry, don't know where!) and printed it to fit the back of my ornament.  Applied shiny mod podge all over, added a ribbon, and wrapped it up!

Now I just need to finish the other two FROM LAST YEAR and work on one for this year.  Which one should be 2012?

source


Recipe:

1 c. baking soda 
1/2 c. cornstarch
3/8 c. water. 
Heat, stirring constantly until too thick. Cool 15 min or until you can handle it! roll out & cut w/cookie cutter. Let dry 1 - 2 days. Save a bit of dough (tightly wrapped in saran wrap) to fill in cracks before painting!

Wednesday, December 5, 2012

DIY Christmas Gifts: Darth Vader Shoes


I got the idea from pinterest and followed the link trail back to this website...His shoes are AMAZING.  


I basically copied the chest plate shoe.  The Darth shoe was inspired from a lamp  I found on google images.  I knew it was something I could paint, and I'm super happy with the way it turned out!


So, I altered this pair on black shoes I picked up from Sears.com for under $20.  I was thinking I wanted to do grey shoes, but they were SOOO cheap.  The black ones had heavy rubber soles and seem like they will last, but those grey ones (which I thought were the same just a different color) were so light...the soles were that foam-y stuff and they just felt cheap!  So I returned them!


I used fabric paint for the black and white, mixing the two to make the shades of grey.  I used regular acrylics for blue and red.  Hopefully they will hold up to everyday use!


I tried to paint a little Death Star and a TIE fighter on the backs...The Death Star turned out better than I thought, but for how simple a TIE fighter is, it was hard to paint that small.  Better paint brushes would have helped!


I used "stencils" to make the lettering.  I just cut out "star wars" and used spray adhesive to adhere to the shoe.  Then it was super easy to paint in the letters!


I used "stencils" a lot on the front of the shoes, too.  I wanted straight, crisp lines and the stencil allowed me to do that!  I kept drawing and cutting out sections, adhered it to the shoe with the spray adhesive, then painted.  The fabric paint dries pretty quickly (touch dry within minutes) so I could easily move on to the next section.


I hope my brother-in-law likes them.  I'm totally in love!


see the 2013 version of Hans and Chewbacca here.

Friday, October 19, 2012

Pin-teresting Friday! Natural Ant Repellant

I've read that mixing Borax with something sweet like jam, jelly, honey or syrup will kill them.  They supposedly bring it back to the nest where all the other ants eat it and they die.

from http://naturalantkiller.net/

I had some ants coming in through a hole near my window sill.  They were making their way across the sill and down the wall behind my sink.  There they would find a s'more-ga-sporg on my dirty dishes piled in the sink and/or next to the sink.

So I thought I would try this.  I mixed up some Borax and Strawberry jelly and smeared it on a paper plate.  I put pieces of the plate next to the hole, on the ant path, and actually blocking the ant path (they crawled over the plate to continue on their path).

In the 20 minutes I stood there and watched (yes, i have too much time on my hands), only 2 ants ventured onto the plates and tested out the jelly/Borax.  Some ants wondered onto the plate, "took a sniff" and went along their merry little way.

The Borax/Jelly didn't seem to do a thing :(  The ants weren't even eating it!

I got some glue out, poured it in the caulk hole, let it firm up and no more ants!


I've also tried using whole cloves, and sometimes it works and sometimes it doesn't.

I wonder if it has anything to do with the TYPE of ant?

Visit this website to read more ways to naturally kill and repel ants.  Let me know if any of them worked for you and what type of ants you tried it on!

UPDATE (12/7):  we still have a lot of sugar ants under the kitchen sink. So I mixed up another batch of jelly/borax, but it on a paper plate section and waited.  Nothing happened - the ants were still walking around it.  So I gave up and went to bed.  When I checked on it this morning, there were TONS of ants on the paper plate and leaving to bring the poison back to the nest.  This went on all day.  When I checked it this evening, there was only one ant...I wonder if all the other ants are dead?

Friday, October 12, 2012

Pin-teresting Friday! Vinegar/Dish Soap Tub Cleaner

So this is ALL over pinterest...

1 part warm vinegar mixed with 1 part blue dawn dish soap sprayed (or spread) over the bottom of your tub WILL clean it with NO scrubbing.

'Tis true.  I'm totally lazy and hate, let me repeat: HATE cleaning the tub.  At least in this house we have a walk in shower, so I don't have to lean over the tub to clean the shower stall.

But I'm still lazy.  And THIS WORKS.  I've been using this method for a couple of months now, but instead of a spray bottle I've been spreading it around the tub.  Today I tried it in the spray bottle and used so much less - although my spray bottle doesn't spray well :(

Anyway.  I warmed 1/2 c. vinegar in the microwave for 1 min (warming the vinegar helps it mix with the soap).  Then added 1/2 cup of blue dawn dish soap (I'm pretty sure this is THE ONE that works.  Something special about Blue Dawn.  Plus, it contains no phosphates and it's gentle enough to clean oil covered wildlife!).  Swirled until they were mixed.  Poured into a spray bottle.  Sprayed the tub.  So it was WET.  Then let it sit until I remembered about it.  About 3 hours.  Used a sponge and wiped.  NO SCRUBBING.  Then rinsed the tub out and it was spick and span.

So Easy.

Just like the website boasts, there was a line down my tub (granted my line was from where I didn't spread the mixture...)

Go.  Try It.  NOW!

:)

Wednesday, October 10, 2012

Halloween Mantle


So the only thing i have on my mantle so far is this Halloween Banner that I finished up the other night.  I have more ideas, but they take time.  Especially with a 14 month old running around!

I got the idea from The House of Smiths, but I instead of letters, I wanted to use these silhouettes that I had cut out for a different project (these were the pieces I'm NOT using).  Hopefully that project will get finished BEFORE Halloween!

She used brown packing paper, but her's looks thicker.  Mine was ACTUAL packing paper from the move ;)  She also hung hers from the top using twine.  I tried hole punching on the sides and i DON'T recommend...some of my accordian folds are stretched out and I had to use A LOT of tape!

To attach the silhouettes to the accordian folds, I first tried white glue.  Not enough surface area.  Then I tried spray adhesive and I thought I was good.  But the morning after I hung this up, a couple trick or treaters were on the floor :(  so i just used tape on the back and everything seems to be holding up well.

Here's some close-ups:


Well, I guess I'll have to start working on the top of the mantle...cuz my banner is going to be lonely.  I want to do this, this, this and this.  hahaha.  wishful thinking!