Pages

Tuesday, July 30, 2013

Teddy Bear Pancakes for a Teddy Bear Picnic

July 10th is National Teddy Bear Picnic Day.  Now, don't confuse this day with Teddy Bear Day - that's September 9th.  

Teddy Bears, in case you didn't know, were named after our 26th president,  Theodore Roosevelt (nicknamed Teddy, but according to wikipedia he loathed being referred to by such.)

Anyway, my mom's group decided we were going to have a Teddy Bear Picnic for the kiddos.  Some other moms were making bear themed foods for the picnic, so I decided to do the same.  I didn't want to go with a sugary item, so I decided to make pancakes shaped like bear heads!


First, you'll want to make two batches of pancake batter.

1/2 recipe of Bisquick supreme (see the back of the box)
and 1/2 recipe hot chocolate  (see recipe here) this is a glorified Bisquick recipe.

If you are anti-Bisquick, you could probably alter your favorite pancake recipe with some chocolate milk and cocoa powder accordingly.  Personally, Bisquick pancakes are my favorite, so I use what I know!
you could do full recipes, but you'll be making bear heads forEVER!

You'll want to put each batch in a squeeze container.  I used one for making chocolate, but a condiment one would do fine.  And I could only find one of my chocolate squeeze containers, and it worked out ok, you can see some of my bear heads are not really round as a result.


1.  Squeeze out white batter for muzzle area (I did all 4 at once).
2. Flip white muzzle (do these one at a time)
3.  blob chocolate over muzzle trying to keep round shape while getting full coverage (I used a spoon for this part, but the squeeze bottle would have been better here!)  If you wait too long, the muzzle starts to get overcooked (browned) and blends in with the chocolate head)
4. add ears with white.
5. Let cook a minute or so and flip.  Finish cooking.

I did the whole batch (including trial and error) in about 25 minutes.  Didn't take too much longer than making regular pancakes once I figured out the order!

You could also change it up and do chocolate muzzle/ears and a white face.  I was working with only one squeeze bottle...

Now you'll need to add a face.  I used white chocolate chips and mini chocolate chips.  You could also use the sugar eyes found in most baking sections (I've seen them at Hobby Lobby and Wal-mart for ~$4 for 12 pairs)

Insert white chips pointy side into the pancake.  If your cakes are still hot, your chop may melt enough for the next step.  If not, microwave your cakes with chips inserted for 10 seconds - this will soften them up enough to get the mini chip in.  Now stick your mini chocolate chip up-side down on the white chip.  This part could be difficult if you have unsteady hands.  I work with beads and threading needles, so I had no problems.  

Eyes, done.


I drew little bear faces with melted chocolate and a paint brush.  I'm not a fan of that method.  Use frosting and a decorator bag with tip, or find another way.  The chocolate painting was TEDIOUS.  The most tedious of the whole thing.


 Not the best pictures in the world, but there's no natural light at 11 o'clock at night!

As you can see, this made 13 bear heads.  I probably ate 4 mistakes.  And made a bunch of plain ones.  I would say one full recipe makes 20 heads?

Let me know if you try these!  The kiddos loved them.  No need for syrup or even heating them up.  We ate them just the way they were!!


Sunday, July 28, 2013

Fairy Tale Friend

I joined another swap... make a "friend" and keep a journal of your summer adventures together! Then pack up your friend and story and send it to your partner.

Meet Pearlina Wishwater:  


Standing at 3 3/4 inches and weighing 1.5 ounces, Pearlina hails from the Red Coral Clan.

Her tail is known to glisten with phosphorescence under the night sky, but being a little older in years she doesn't stay out late like she used to!  

Still young at heart, her pastimes include wave surfing close to the shore on windy days, collecting treasures from the beach and ocean to create interesting caches!

Here is a little video of her journal now on its way to my swapping partner :)


I made the journal with my bind-it-all by wrapping some material around thin cardboard (old cereal boxes) and the pages are card stock.  Some of the pages are lined with water color paper or additional card stock.

Disclaimer:  I drew and created most art in the journal.  However, some of the art I mimicked from other artists.  Some of the art (like the magazine covers) are other artist's work completely.  I make no claim to any of that art :)

Fabric Postcards

I joined a swap to make Fabric Postcards.   You had to add color in some way other than fabric or thread.


I decided I wanted to use this mermaid fabric b/c well, I love mermaids!  I added sequins and beads to her tail.  She got a sequin up-grade on her necklace too!  I used paint to accentuate the background waves.


A couple weeks later, we went to a swim play date at a friends house.  Both the hostess and her daughter love mermaids so I did another version of the above postcard, this time including a little fish.


I tried a fancy stitch from my sewing machine...I think it's pretty :)


Friday, July 26, 2013

Dolphin Frame

For the family vacation this year, my husband's family traveled the nearly 1,000 from Ohio to stay at a beach house in Pensacola, FL.  At the end of our trip, we were perusing the tourist merchandise, and found this:


My MIL liked it, but even at $15, it felt SUPER flimsy.  And we joked about how I could make something better.  

I don't know if what I made is better or not, but it is more personalized...


On a couple different days during vacation, we saw dolphins swimming right off our docks!  The boys jumped in and tried to wade after them...


The next day, we had a rented catamaran and pushing off the beach we spotted the pod again and got chased by a couple of the dolphins - it was only for 10 feet or so, but it was still pretty cool. 


I found the frame at TJ Maxx for less than $5.  Sanded it down, painted it grey and added some sort of poem or saying about moms and family.  Attached the wire dolphin that I hand wove with glass beads, added the picture and here we go.  Mother's Day present.  This is the frame displayed in our house and it *almost* motivates me to make another to keep for myself :)


Wednesday, July 24, 2013

Peg People: Scuba Diver and kokeshi style Mermaid

check out Ironman/Thing here.

So for my other swap partner, I decided to make a Scuba Diver and a Mermaid.


As with Thing, I couldn't find a lot of scuba divers around, so I decided to accept the challenge and try to create my own!


This little guy has twin tanks on his back.  Handcrafted from rolled up cardstock filled with hot glue then covered (one could say decoupaged) with newspaper and painted yellow :)  Classy, I know.


Originally, the tanks were going to be removable, so attached is a small hair elastic.  But when I finally settled the tanks on the diver's back, they stuck out a little wonky and looked silly...so they got super glued to the peg.


This guy also has some cardstock fins, covered in clear packing tape to make them a little more durable.  If this peg is to be played with by a child, the fins would need to come off as they are not very durable.


I wanted his mask to be a little cloudy so that it would look like plastic...so I mixed some of my high gloss sealer with a touch of white paint.  I think it's a little more cloudy than I wanted, but we'll just say he's a heavy nose breather and keeps fogging up his mask :)


I got lazy and didn't put "weights" on his weight belt, they are just black dots.  But I'm really liking the yellow buckles for everything...added a nice bit of color.


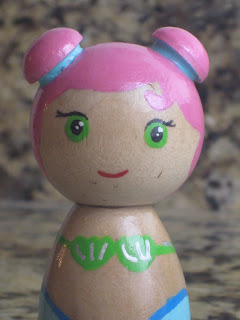
I love this mermaid. 


 I really like the kokeshi pegs you can find on etsy, but the blank dolls are $$$, in my opinion.  So, I made my own.  


It's an egg shaped wooden piece and a sphere.  I drilled holes in both and used a dowel and wood glue to attach them.  My head is a little crooked, but whatever.  Turned out pretty good for my first Kokeshi attempt.  And only cost me $0.25.  Way better then the $4+ going on etsy.  


Her buns are wood buttons also found in the wood section at the craft store.  I drilled holes to fit and glued them in :)


I LOVE these eyes.  Copied them from abbyjac on etsy (she has some GREAT pegs :)

These guys went off to their forever home and I hope they will be happy there!


Tuesday, July 23, 2013

Peg People: Tony Stark as Ironman and Thing from Fantastic Four

Do a search on etsy for peg people and you'll find over 2,000 items!  They are quite popular considering how simple they are.  I'm a little obsessed - just check out my pinterest page if you think I'm kidding...


I joined a Peg People swap on swap-bot (it's an on-going series) and one of my partners indicated that her son would like Ironman and Thing.


I had to be a little different and I painted Ironman with his helmet off.  During the last movie (Avengers, I think) it seemed like he spent an awful lot of time in his suit w/o a helmet :)


I found very few Thing listings around, so I thought this would be a good choice for the little boy.


My daughter enjoyed playing with the Tony Stark peg, but I hear they've found a good home :)